Thursday 27 September 2012

Back to School

So, I'm back in Aber preparing for a new year. Exciting stuff. Still, before I came back I got some more stuff done- I finished off the RC car scratch build, built a 1/76 Panzer III and acquired the SF3D board game (rare & precious treasure!).
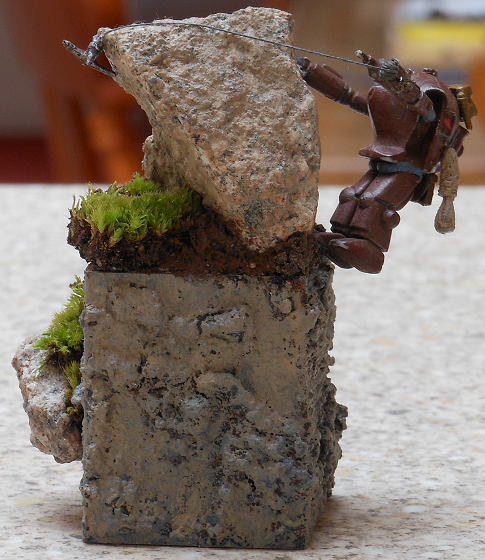
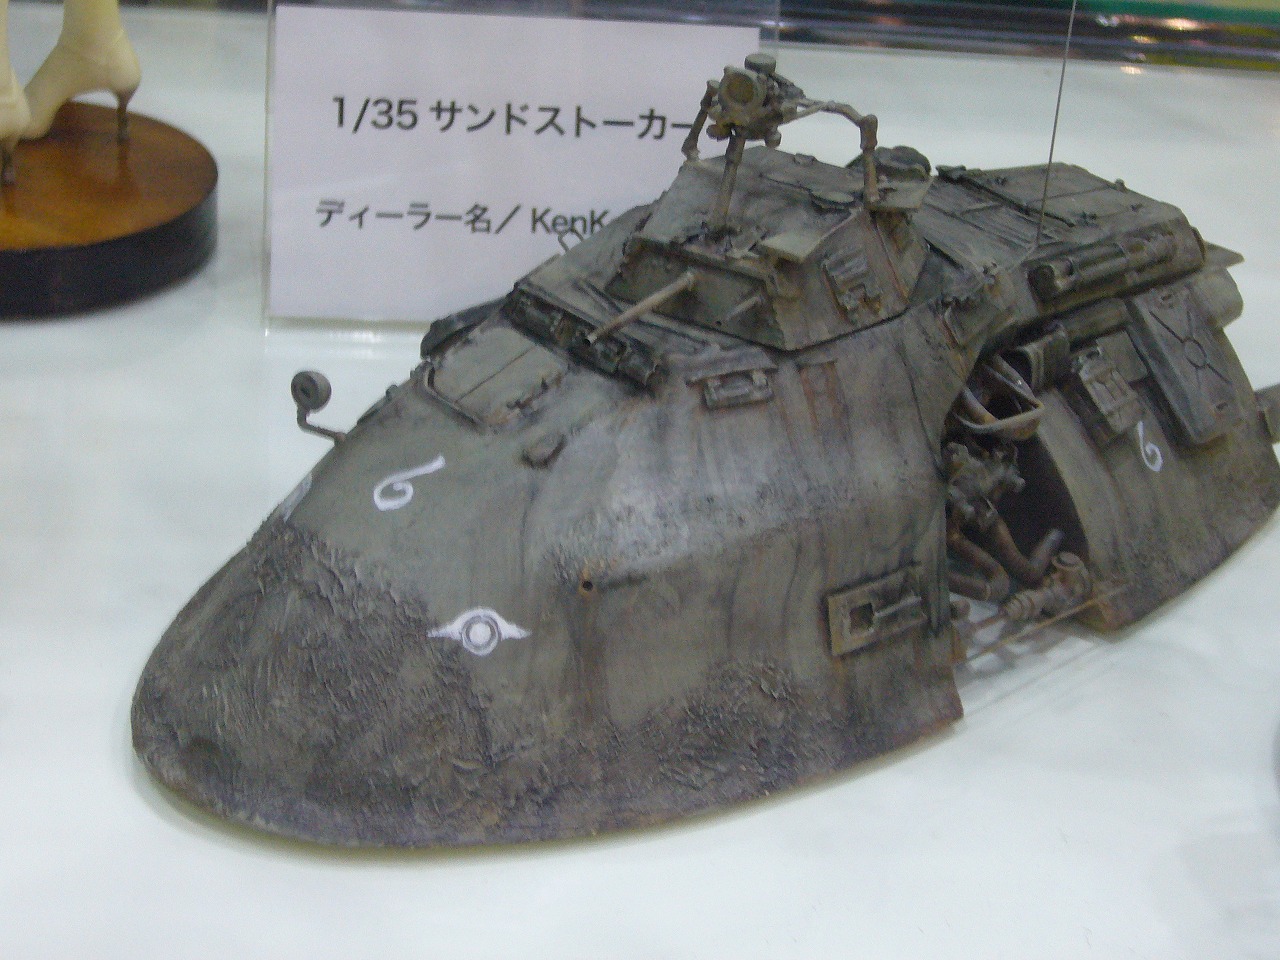
Right, the RC scratch. The build process following my last post was essentially more spoons and more milliput, then add stowage. I got quite a few little bits off of eBay for it- figures (Tamiya M577 crew) & stowage (an academy set)- seeing as I wanted to properly base it. And so I did. The paint job & my chipping technique could definitely use improvement. Still, it's now sitting completed on my window ledge back in Tring, so I'm happy.


I built a 1/76 Panzer III too- an old Nitto one. Damn, that kit was kinda bad- the detailing seemed alright, but assembly was a pig. Didn't help that I decided to chop up and pose some 1/76 figures which came with the kit. Biggest faff of my life that was... However, I really do love painting 1/76 armour. They're small enough that you can paint them in a day, but you can still have fun with all the weathering you can do on them. I did a vaguely historically based camo pattern, with a network of Dark Flesh lines over the top of Castellan Green. I'd really like to try that pattern on a Ma.K suit- I'm going to be getting an AFS Polar Bear soon I hope, so I can try it out on that.


Lastly, the SF3D board game! I'd been keeping an eye on this on the Ma.K forum for a while and when money came in from my summer job (a paper round. Yay...) I saw my chance, along with a loan from a friend, to get this rare item. I believe just over 2000 were made, and I'd assume the majority of those are in Japan. It's a hex-based wargame, and I've had a couple of games with friends and I really enjoy it- it's not just a collectors piece. Although the shooting dice rolls seem a bit archaic at first, you quickly pick them up. Nicely made all round and fun. If you do get a chance to buy a copy (unlikely) then I recommend you do!
 Lovely lovely box art.
 The 4 maps you get.
 All the scenario cards, air commitment cards, summary sheet and the manual. All in Japanese unfortunately. Some copies were sold in America by a company called Twentieth Century Imports and had an English rulebook and summary sheet. However, there's quite a few copies of the English rules and a translated copy of the Japanese rules on the internet (the most comprehensive version is here). The English & Japanese rulesets do differ significantly; I prefer the English rules myself.
All the little tokens you get.
An action shot- the IMA (green) attacking SDR (blue) forces after crossing a river.
So much armament disabled...

As an epilogue, the SF3D board game's really got me into hex-based wargames. Check out Memoir 44 Online (it's free to download) and, if you have an iWhatever or an Android device, Neuroshima Hex. I'm loving both of them.

That's all for now, so until next time, goodbye.

Monday 20 August 2012

Late, as usual!

Update time! I actually have an excuse for the long delay, I was busy cycling from John O'Groats to Lands End. Even if I finished more thank a week ago. Shush.

Anyway, I got the Nutrocker done. Good fun build, and it was my first time using a rattle-can base coat in more then 5 years and it sure beats using a brush to basecoat. It was just a case of spray, leave to dry, two coats of the main colour (Vallejo Game Colour Camouflage Green, every other paint was GW) and then on to details. Certain bits were painted in Shadow Grey, to mix up the colour a bit. The brown splodges are supposed to be camouflage of Snakebite Leather & Dark Flesh, but the Snakebite Leather gets drowned out a bit by the pigments. After the camo I did the ID band- Ultramarines Blue. At first I used it watered it down and some of it seeped out from under the masking, and I kicked myself for that; then I realised it was a good way to grubby up the Nut, so I went over the whole thing in a very watered down coat of the same blue. I then did pin washes using Devlan Mud, drybrushed the whole thing in Vomit Brown and then did some chipping using Boltgun Metal, focusing on the railings and engine bits. Lastly I coated the whole thing in MiG Dark Mud pigment (I love that stuff) and around the chippings and engine bits I put on some MiG Light Rust pigment. And it was done. I'm planning a full-size base in the imminent future, but for now here are the pics as is.


Before I started doing EtE I found an old RC car and thought it had great potential as a Sandstalker look alike. Here's my initial idea, using a cupola, crew & machine gun from that 1/35 Abrams I have lying around, the front off an old Space Marine Rhino and some other stuff.
Well, after I muddled about and added some spoons a very kind gent on the Maschinen Kreiger forums did some spiffy concept art for me and I had a much clearer idea of what I wanted the thing to look like. And this is how it looks now.

And that's all for now folks!

Thursday 12 July 2012

Many things.

Many things have happened since my last post.
Firstly, I got the Melusine finished! Fun build, a good introduction to Maschinen Kreiger kits. I'm pretty pleased with the results, but I fluffed on the baggage I tried to make with milliput. The paint chipping/rust technique I got from a guy off of the Ma.K forum. It's essentially dry-brushing a mix of Red Gore, Chaos Black & Tin Bitz with a sponge. It probably needs to be applied a little heavier than it is here, but looks OK I reckon.
Next up, I managed to find a 1/76 Nutrocker on eBay and nabbed it! I also made a video giving the kit a lookover, which can be found here.

Before making the Nutrocker, I made the little SAFS which comes with the kit and made my first diorama, using a cocktailstick box full of polyfilla, plenty of dirt & PVA glue and some moss.


I had to pose the legs with green stuff, and the suit was pretty hard to pose. Still, it was a fun build. The pouches & rope are from the Bolt Action paratroopers (which I've done barely anything to still...) and the hook & reel is made from a bit from the 1/35 Abrams (which aside from that reamins untouched), two Bolt-action pick-axe heads and some thread. I tested out the Mig pigments I got for the Nutrocker on the suit, and was pretty pleased with the results. Like drybrushing, just a hell of a lot dryer, and easier to fix if you put it on too heavy The stone pillar bit is PVA glue mixed with soil, then overbrushed with Shadow Grey and several layers of Kommando Khaki.

I'm doing the Nutrocker now, but I'm tempted to make a PaK variant using a Chieftain turret. Hopefully I shall remember to get around to updating this blog more often!

Sunday 3 June 2012

Apologies for the delay

ARGH!!
Hello readers. The last couple of weeks have been full of all manner of shenanigans involving exams, leaving uni for the summer, nerf deathmatches and so on.
However, in the intervening time I have done a fair bit of modelling & painting, so it is not all doom & gloom!
Firstly, the esteemed spider tank- now formally named the Adams tank- has been painted, built, non-maliciously smashed, pieced back together and gamed with (where it did well until Fallschirmjäger dropped behind it with panzerfausts).
I have a painting guide for it in paper form which I will find and post soon, but for now, some pictures!


I've also put together my British paratroopers and in the past days been making good progress on my Melusine- so more updates soon.

Friday 4 May 2012

Painting continued

Sorry for the lack of updates- been back at uni since the 21st of April and haven't gotten around to posting till now.
Basically, I didn't get the Rasenmaeher finished, but the painting's pretty close to completion. After about 3 coats of Snakebite Leather I managed to rectify the bad coat of Kommando Khaki, and then got onto the patterns. Initially I tried to use a paper template but due to wet paint, the paper stuck to the paint and when I came to remove the template it ripped off bits of paint all the way back, so after the first use I just drew on in light pencil the rough location of the pattern and then painted over those. I used alternating Dark Flesh and Vomit Brown for the pattern.
After that I did some detailing, but I can't remember exactly how or what with. I know the metallic colours were either Boltgun Metal or Dwarf Bronze. I also used transfers for the first time, and did some lining in, a technique which works quite well on the figures I'm used to, and came out alright. What I realise hasn't come out alright is the Milliputt work... Need some more practice with that I think...
Anyway, here is the progress so far...


I'm making quite a bit of progress on that Spider tank, and have Bolt Action Miniature troops and my first MaK figure- a 1/35 Melusine- to make a move on. Roll on the end of exams, so I can get on with them without feeling guilty!

Sunday 15 April 2012

Spider tank, Spider tank; or why not to buy recasts

So yesterday I got a package all the way from China, which took over 3 weeks to get to me- a little spider tank. Looking for a little mech to use when I start playing Secrets of the Third Reich and completely in love with this build I decided to try to track down a kit. Which I kind of did and here we get to the main point of this post- recasts. I was pretty damn certain the kit I was getting off of eBay was a recast, but I wasn't really aware of all the issues which come with that when I ordered it. But lo, when the package turned up yesterday and indeed it is a recast. Now I don't really know much about quality of kits, coming almost entirely from a little Games Workshop hole, but I can tell there are issues with this kit. Most of these pictures are after I've already started making the kit ready, but you can see the issues pretty clearly.
HUGE sticky out bits on the front of the hull and in the recess where the gun goes and lots of weird lines and pits.
Very thin leg armour plates, some essentially transparent in places.
The engine block has joints where the legs are supposed to attach, which I'd imagine are supposed to correspond to the gaps on the underside of the hull for the legs. However, this is not the case, with the joints on the engine block and the gaps in the hull being way out of line with each other. The engine block also had a very thick layer of resin left over on the flat side which needed quite a bit of cutting & sanding down. The same was true of the gun section.
Credit where credit's due however- the leg pieces and the detailing on the hull are actually pretty nice, at least to my untrained eyes, despite weird black bits embedded in the hull...
All in all, for £10 I don't suppose it's too bad- I'm certainly still going to paint it up and use it. But next time I want a model I'll know to save my pennies rather than let my haste get the better of me. Anyway, back to the Rasenmaeher next post- the patterns are more or less done, so onto the detailing and weathering!

Thursday 12 April 2012

Painting phase 1- MaK scratch-build 5

Onto the painting stage! Painting something this big is a completely new experience for me, but I knew I'd need a spray gun. I asked a friend if I could borrow his, and the answer was yes. Unfortunately, it's a Games Workshop spray gun, which is a pile of cack. I could barely get it working at all, though admittedly it was OK for the brief periods when it was working. So most of the time I was using a 3/4" paintbrush, so the coverage is pretty rough.
First was a Chaos Black undercoat, for which the spray gun WAS working for most of the time.
After that was some paint mix I made years ago and annoyingly didn't make a recipe. I'm pretty certain it involved Camo Green & Snakebite Leather. Anyway, I mixed it 1:1 with water and started painting with the large paintbrush at this point. After that dried, I went over the areas with poor coverage again with just the paint.
Then I went over with another 1:1 mix of Kommando Khaki. This coat's pretty patchy, I reckon I'm going to have to do another one, but it is nice as weathering. What a shame I'm not on that stage yet...

Camo pattern (kinda) and detailing soon.

Tuesday 10 April 2012

Milliput and engine bits- MaK scratch-build 4

After realising polyfilla was probably a terrible idea, I went out and got some milliput to round out the hull, and the result was this-
Needs a bit of smoothing out, but for my first time using milliput, I think it's alright. I then moved onto doing the engine bits. I realised that the parts would seem way too exposed and just bits on a flat-surface if they weren't placed in a lowered area, and I tried cutting this into the card which was already on the model, without realising that the PVA glue would stop that from working properly... Silly me.
So instead I made two additional layers of card, both with the same hole cut into them and glued these to the hull. For the engine parts- or at least visible bits of the engines workings I mostly used more 40K bits, but I also used a cable grip from the inside of a socket for a fan and some iPod earphones for cable. The large piece on the top right is supposed to be a heatsink or something similar, and is the foot from a Tau vehicle landing leg, left over from the radar dish on the turret.
After I'd finished the engine bits, I used more milliput to round the card off. After that I glued on the turret on top of its card base.
I felt the hull top looked too bare just with the engine in the middle so I used yet more 40K bits- aerials and the barrels from a Tau Burst cannon as exhaust pipes.
Now I think the build stage is more or less finished, though I may sand down the milliput as it isn't the smoothest of jobs- lots of lumps. I've also decided on a name for the tank, which I think suits its anti-infantry main gun- the Rasenmaeher, or lawnmower. Anyway, I'll leave you for now with what the Rasenmaeher looks like at the moment. Painting should start on Thursday, after I've borrowed a friends spraygun.